How to Add a Rain Effect in PowerPoint: A Step-by-Step Guide
PowerPoint is a smart tool not only for presentations but also for creating visually appealing designs. Whether you are designing a presentation, an infographic or an artistic slide, adding a rain effect can elevate your visuals and make them stand out. In this article, guide you step-by-step on how to create a rain effect in PowerPoint without using any other heavy external software required.
This method is easy to follow and works best when paired with a suitable image that complements the rain effect.
Why Add a Rain Effect?
Rain effects can add depth, drama, and realism to your visuals. It is an excellent way to convey mood, whether you are presenting on topics like nature, weather, emotional themes, or artistic concepts. By learning how to add a rain effect in PowerPoint, you can create professional-looking slides with minimal effort.
How to add a Rain Effect in PowerPoint
Step 1 : Insert a Suitable Image
As the first step, select and insert a suitable image. The rain effect works best when applied to images that have outdoor settings, such as landscapes, cityscapes, or nature scenes.
- Open your PowerPoint presentation or create a new slide.
- Go to the Insert tab on the ribbon. (01)
- Click on Pictures and choose the location of your image.(02 & 03)
- Select the image you want and click Insert.

Tips for Choosing the Right Image:
- Outdoor Themes: Images with cloudy skies, streets, or forests create a more realistic rain effect.
- High Contrast: Choose images with distinct light and shadow to make the rain effect more noticeable.
- Empty Space: Pictures with open areas make the rain effect more prominent without overcrowding the scene.
Step 2 : Adjust the Image’s Brightness and Contrast
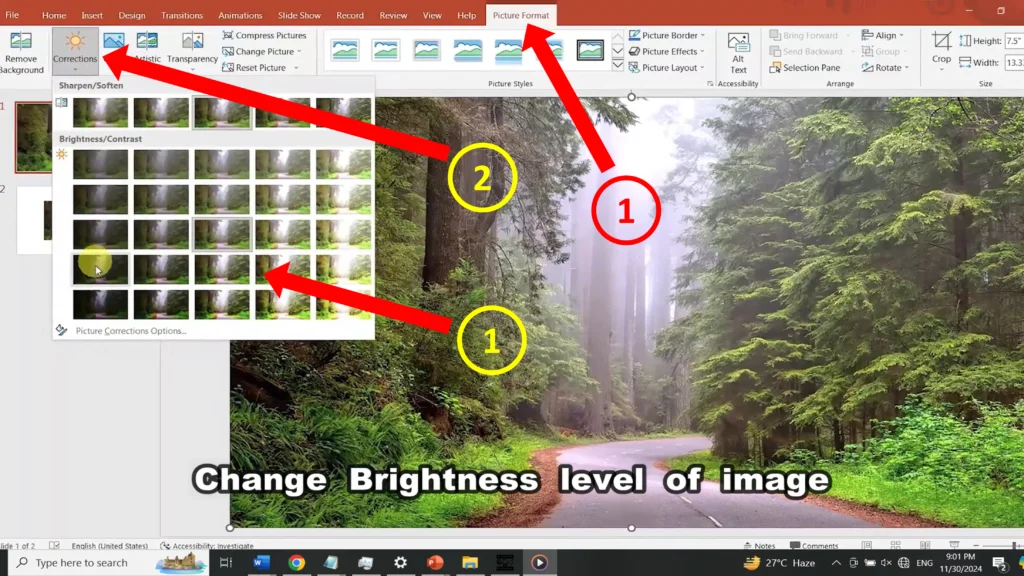
To make your rain effect realistic, it’s important to adjust the brightness and contrast of your image. This step helps you set the mood and ensures the rain stands out.
- Select the inserted image on your slide.
- Click on the Picture Format tab in the ribbon. (01)
- Under the Adjust group, click on Corrections. (02)
- From the drop-down menu, adjust the brightness and contrast by choosing from the available options or clicking Picture Corrections Options for more precise control. (03)

Suggested Adjustments:
- Reduce the brightness slightly to create a cloudy or overcast appearance.
- Adjust contrast levels to enhance the details in darker areas.
By fine-tuning these settings, you can create the perfect backdrop for your rain effect.
Step 3 : Apply the Artistic Effect
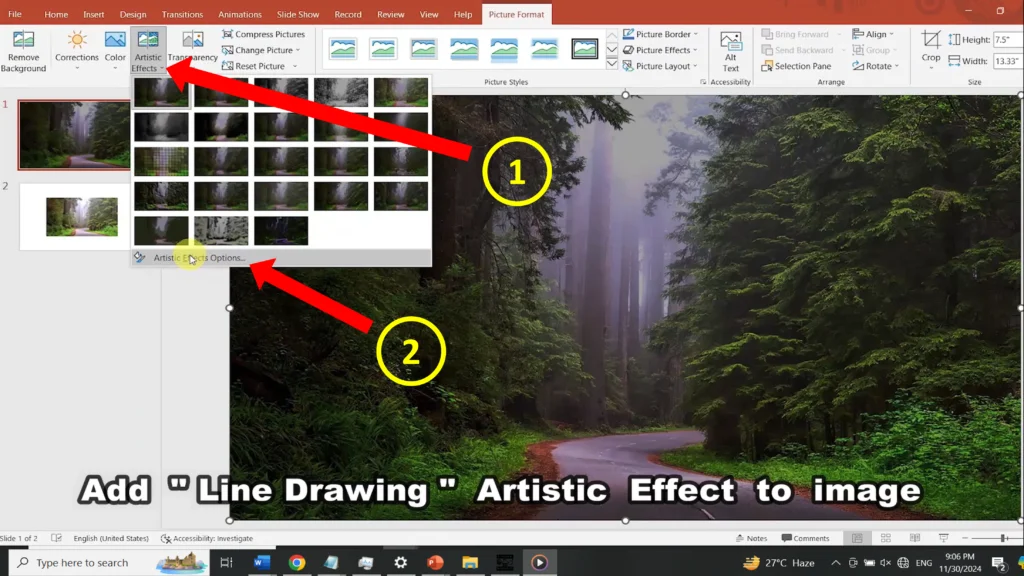
PowerPoint’s Artistic Effects tool offers a variety of options to modify your image’s look. For a rain effect, we will use the Line Drawing effect. This effect adds a sketched, textured appearance that mimics the streaks of rain.
- Select your image.
- Go to the Picture Format tab.
- Click on Artistic Effects in the Adjust group. (01)
- Click on Artistic Effects Options… From the drop-down menu. (02)

5. From the drop-down menu, select the Line Drawing option.
Once applied, your image will take on a hand-drawn, monochromatic look that resembles the first stage of a rain effect.
Pro Tip: If the effect looks too intense, don’t worry! We will adjust its settings in the next step to make it more subtle.
Step 4 : Customize Transparency and Pencil Size
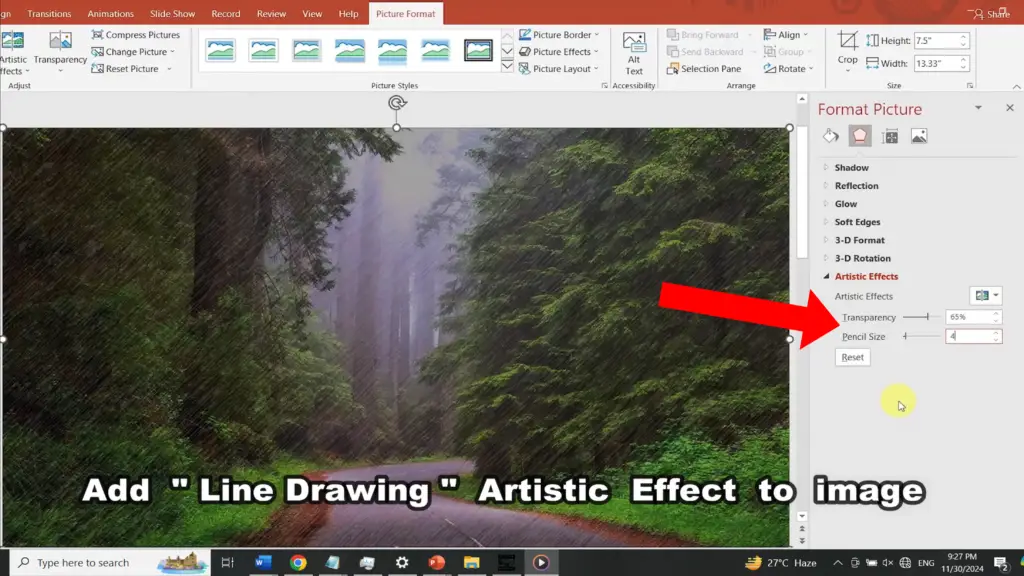
To refine the rain effect, you need to tweak the transparency and pencil size. These settings allow you to control the visibility and thickness of the rain streaks, ensuring they blend seamlessly with your image.
- With the image still selected, click on Artistic Effects Options at the bottom of the Artistic Effects menu.
- In the sidebar that appears, adjust the following:
- Transparency: Increase transparency to make the rain streaks lighter and more natural.
- Pencil Size: Reduce the pencil size to create thinner lines, giving the illusion of finer raindrops.

Experiment with these settings until you achieve your desired look. A subtle effect often works best, as overly dramatic changes can look unrealistic.
Example Settings:
- Transparency: 50–70% for a soft rain effect.
- Pencil Size: 2–4 points for delicate rain streaks.
Enhancing the Rain Effect
While the above steps give you a solid rain effect, you can take it further by incorporating additional elements:
Adding a Motion Blur Effect
For a more dynamic look, you can simulate the motion of falling rain by adding a blur effect:
- Right-click on your image and select Format Picture.
- In the Format Picture pane, go to Effects > Soft Edges.
- Slightly increase the edge softness to blur the lines and enhance the rain’s movement.
Overlaying Transparent Shapes
To mimic water droplets or splashes:
- Insert a rectangle or freeform shape over parts of your image.
- Set the shape fill to a transparent white or gray.
- Add a Soft Edges effect to blend it naturally.
Final Touches: Adding Context to Your Rain Effect
Once you’ve created the rain effect, consider adding complementary design elements to your slide:
- Text Overlays: Use bold, sans-serif fonts for titles or quotes to contrast against the textured background.
- Animations: If you’re using the rain effect on multiple slides, apply transitions like Fade or Wipe to simulate movement.
- Color Adjustments: Use a cool-toned color scheme (blues and grays) to emphasize the rainy atmosphere.
Why Use PowerPoint for Visual Effects..?
Many people underestimate PowerPoint’s capabilities for creating visual effects. With tools like Artistic Effects and Adjustments, you can transform ordinary images into creative designs. By following the steps in this guide, you can achieve professional-grade rain effects without needing expensive design software.
Adding a rain effect in PowerPoint is a simple yet powerful way to enhance your visuals. By inserting a suitable image, adjusting its brightness and contrast, applying the Line Drawing artistic effect, and fine-tuning transparency and pencil size, you can create a realistic and visually appealing design.
Remember, the key to a great rain effect is subtlety-less is often more. Experiment with different settings and images to find the perfect balance for your presentation or design.
By mastering these techniques, you’ll not only elevate your PowerPoint skills but also impress your audience with unique, custom visuals. So, grab an image, open PowerPoint, and start creating your rain effect today!


